New (Ubuntu) life for Android Things Pico iMX7
In 2017 Google hosted Google Developers Day in Krakow. I was pretty glad to hear all the new stuff in the Android Ecosystem and talks were awesome. Each attendant received a beautiful gift — The Android Things Pico Pro Maker Kit. I have played with it for a few weeks but, after all, it landed somewhere deep in the Room of Requirement*.
A few years later I have found a reason to have a local server, especially a low energy server. I started looking for RabsberyPi, Adruino, and others. I discovered TechNexion Pico is selling side by side with embedded systems above. More than that it has a higher price.
So I give a visit to the Room of Requirements to get Pico iMX7 back. Plugged in to check if it works. It booted with Android perfectly. Android Things OS is nice but too limited for local server usage or I am too lazy to find out how to run it.
The first thing to search for was how to run different Linux distribution on it. Hitting the official TechNexion website was enough to find a download center specifically for this model. I was pretty glad to see that there are prebuild images of Ubuntu 18.04(preview), Ubuntu 16.04, and Yocto. Instant click on the download link. A few minutes later I have an unzipped folder with image file and documentation.
Reading through the documentation was not a pleasant experience as it contains also instructions for different models of iMX6 and the iMX7 boards. But I should say that folks at TechNexion have awesome naming ideas:
- PICO-IMX7D-DWARF
- PICO-IMX7D-HOBBIT
- PICO-IMX7D-NYMPH
- PICO-IMX7D-PI
I have detected mine by images of the boot mode switches — I am a proud owner of PICO-IMX7D-PI.

Time to start the flashing process. Just for information my host system runs Manjaro distribution.
The first step is to change the boot jumpers to switch boot mode to “serial download mode”.
In my case, I was using the tool from iFixit and after the change, boot jumpers looks like on the image.
The documentation tells us about 2 types of flashing: SD card or using USB-OTG installer. But it would be too easy and should not be a reason to create a post like that.
We are going to use the UUU(Universal Update Utility) MFG Tool for flashing to eMMC. This tool is listed as the first one in the list of download center. (ftp://ftp.technexion.net/development_resources/development_tools/installer/imx-mfg-uuu-tool_20200327.zip)
It contains instructions on how to proceed and link to the GitHub Wiki: https://github.com/TechNexion/u-boot-tn-imx/wiki/Use-mfgtool-%22uuu%22-to-flash-eMMC
A sample command is presented but some parameters are not so obvious.
sudo uuu/linux64/uuu -b emmc_imx7_img imx7/imx7-SPL imx7/imx7-
u-boot.img fsl-image-qt5-validation-imx-pico-imx7.sdcard
The command should contain 4 parameters after `-b`. Where do we get those? For the SPL and u-boot image, it was no deal. Unzipped ‘UUU MFG Tool’ folder contains a special folder `imx7` with those files. But what about emmc_imx7_img? The recursive search for the rescue. It seems that emmc_imx7_img.auto file can be found in the `multiboard` folder.
So final command looks like:
sudo uuu/linux64/uuu -b multiboard/emmc_imx7_img.auto imx7/imx7-SPL imx7/imx7-u-boot.img ~/{path_to_unzipped_ubuntu_folder}/pico-imx7_pico-pi_ubuntu-16.04_sdcard_lcd-800x480_20171211.img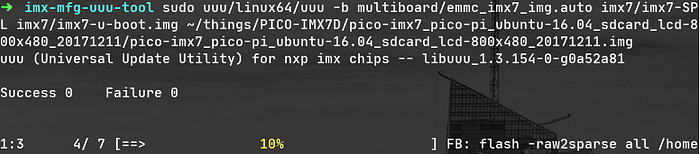

On success, we have to change our boot jumpers to “boot from eMMC” mode. Do not forget to disconnect the power first!
Finally, we can connect the USB C cable and watch the magic. Ubuntu 16.04 is up and running.
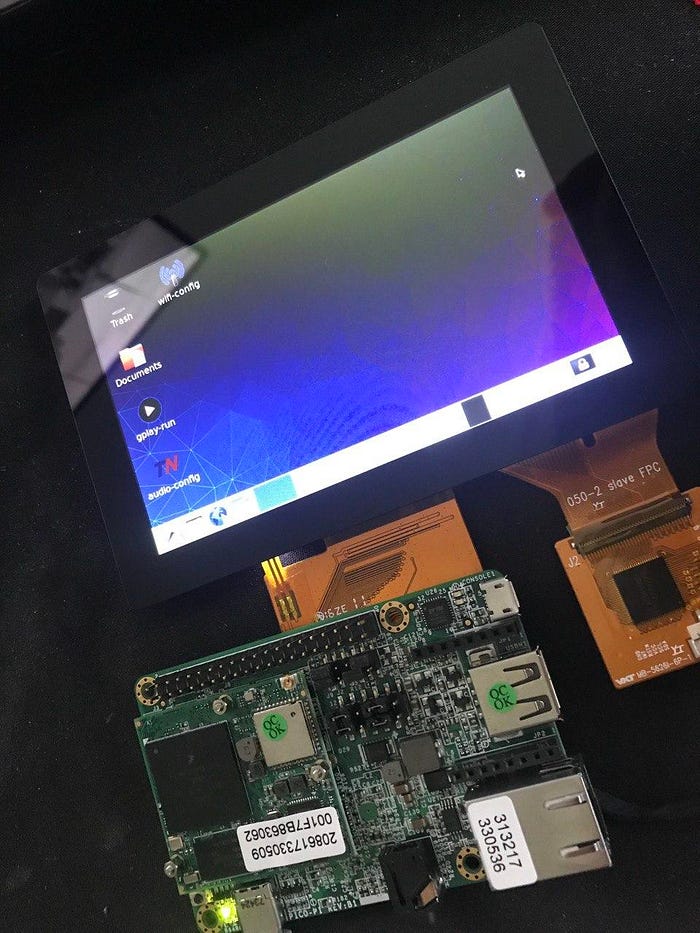
That’s it. My Pico iMX7D will live as a local server with the Ubuntu system. In the next story, I will cover what will run on it and how it is performing.
*PS. Please clap if you have got a Harry Potter terminology.
PS 2. That is my first technology blog post any feedback is welcome.
Tech should be fun.
Sources:
- https://www.technexion.com/support/download-center/?wpv-product=pico-imx7-emmc&wpv_aux_current_post_id=78&wpv_view_count=181-TCPID78
- https://github.com/TechNexion/u-boot-tn-imx/wiki/Use-mfgtool-%22uuu%22-to-flash-eMMC
- Ubuntu image: ftp://ftp.technexion.net/demo_software/PICO/IMX7/pico-imx7-emmc/Installer/pico-imx7_pico-nymph_ubuntu-16.04_installer_vga-640x480_20180313.zip
- Flashing process video: https://vm.tiktok.com/wqkG9s/
- Boot video: https://vm.tiktok.com/wVE3Ky/